
Today we'll do another product of our "winter" series and for the coming New Year holidays we will make a beaded Snow-maiden. It can either be used as a Christmas tree decoration, or in various combinations with other beaded Christmas figures.
We will need:
- seed beads #8 of seven colors: blue and white for clothes, beige for a face, yellow for hair and braids, turquoise for eyes and bows, one orange bead for a nose and two pink beads for lips,
- one white round bead of 6 мм in diameter,
- wire 0.3 mm in diameter.
To make a Snow-maiden I used a wire of 120 cm in length, but I recommend to take a little longer wire to have a reserve.
We will use the technique of three-dimensional beading. Each row of the figure consists of two tiers: the upper tiers will form the front part of the Snow-maiden and the lower tiers - her back.
First, string onto the wire a white round bead and 4 blue seed beads. Place the set on the middle of the wire.

Take the end of the wire from the side of the round bead and pass it through all the seed beads from the side of the other end of the wire.

Tighten the wire trying the round bead to stay on the middle of the wire.
Those 4 seed beads form the upper tier of the 1st row.

For the lower tier of the 1st row string onto any end of the wire 4 blue seed beads.

Pass the other end of the wire through these beads.

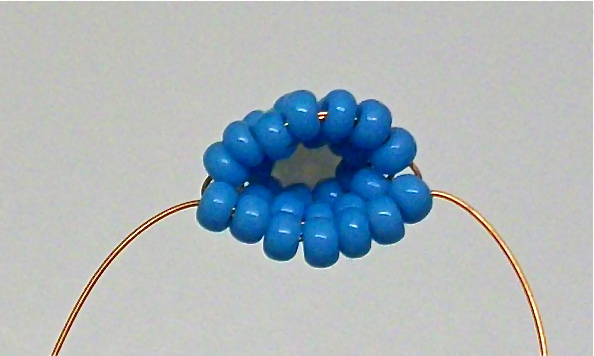
Tighten the wire and place the last set of beads below the upper tier of the 1st row. So we've created the lower tier of the 1st row.

Side view:

Row 2:
For the upper tier string onto any end of the wire 5 blue seed beads

and pass the other end of the wire through these beads.

Tighten the wire and bend it, placing the last set of beads above the lower tier of the 1st row.

Side view at this stage:

For the lower tier string onto any end of the wire 5 blue seed beads,

pass the other end of the wire through these beads

and tighten the wire, placing the last set of beads under the upper tier of the current row.

All the next rows make in the same manner.
Row 3:
The upper tier - 7 blue beads.
The lower tier - 7 blue beads.
Side view at this stage:

Row 4:
The upper tier - 9 white beads.
The lower tier - 9 white beads.

Next, make the braids. Take any end of the wire and string onto it 6 yellow and 2 turquoise seed beads.

Hold the last bead and pass the wire through the closest bead in the opposite direction.

Move all the beads close to the figure and tighten the wire.

Then string onto the same wire 2 turquoise seed beads.

Again, hold the last bead and pass the wire through the closest bead in the opposite direction.

Move these beads close to the braid and tighten the wire.

Next, string onto the same wire 1 yellow seed bead and pass this wire in the opposite direction through the first 6 yellow beads of the braid.

Pull the wire - we’ve got the braid with a bow.

Next, make the same braid with a bow on the other end of the wire.

Continue weaving and start making the 5th row of beads.
For its upper tier string beads onto any end of the wire in the following order: 2 beige, 1 turquoise, 2 beige, 1 turquoise and 2 beige.

Pass the other end of the wire through these beads

and tighten the wire, placing the last set of beads as the upper tier of the 5th row.

The lower tier - 8 yellow beads.

Row 6:
For the upper tier string beads in the following order: 3 beige, 1 orange, 3 beige.
The lower tier - 7 yellow beads.

Row 7:
For the upper tier string beads in the following order: 2 beige, 2 pink, 2 beige.
The lower tier - 6 white beads.

Row 8:
The upper tier - 7 white beads.
The lower tier - 7 blue beads.

Next, make the arms of the Snow-maiden. Take any end of the wire and string onto it 3 blue, 1 white and 2 blue seed beads.

Hold the last bead and pass the wire through the closest bead in the opposite direction.

Move all the beads close to the figure and tighten the wire.

Then string onto the same wire 1 white and 2 blue seed beads.

After that pass this wire through the very first blue seed bead of the arm (which is closest to the body).

Pull the wire - we’ve got the Snow-maiden’s arm.

Next, make the same arm on the other end of the wire.

Continue weaving the rows of the body.
Row 9:
For the upper tier string beads in the following order: 3 blue, 1 white, 3 blue.
The lower tier - 7 blue beads.

Row 10:
For the upper tier string beads in the following order: 4 blue, 1 white, 4 blue.
The lower tier - 9 blue beads.
Row 11:
For the upper tier string beads in the following order: 5 blue, 1 white, 5 blue.
The lower tier - 11 blue beads.
Row 12:
For the upper tier string beads in the following order: 6 blue, 1 white, 6 blue.
The lower tier - 13 blue beads.

Back view at this stage. You can see the lower tiers of rows of the body.

Now make the last - 13th - row:
The upper tier - 15 white beads.
The lower tier - 15 white beads.

Weaving is completed. Now fix the wire. Take any end of the wire and pass it through all the beads of the upper tier of the last row.

Then twist together both ends of the wire and cut them off leaving only a small tip.

Bend this tip and hide it inside the figure.
The beaded Snow-maiden is finished!
Back view:

Since this figure is small it should keep a good form and not require an additional sewing. But if you want the figure to be more tough you can sew it with a thin nylon line. To do so, use the technique of cross-linking which is described in detail here or here.
P.S. If you like this tutorial, share it with your friends on social networks using the buttons below the post.
Don't want to miss new tutorials? Subscribe for email notifications of site updates or follow us on Twitter!
No comments:
Post a Comment