
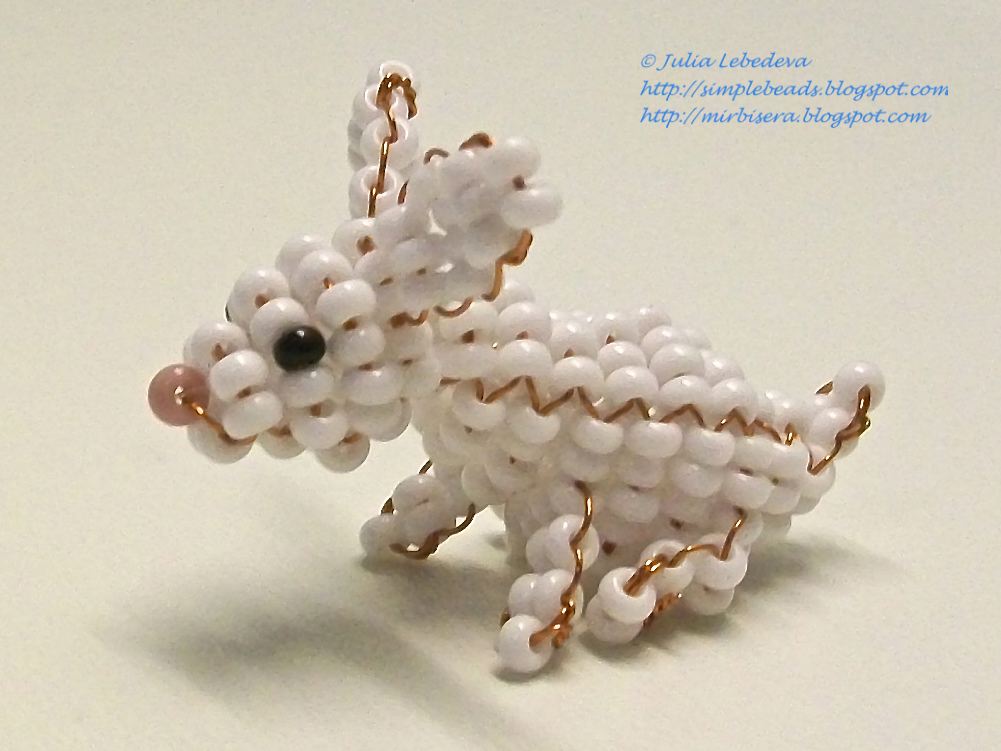
Today we will make another beaded animal in the technique of 3D beading; it is a hare.
We will need:
- size 8 seed beads of white, black and pink colors;
- wire 0.3 mm thick;
- thin nylon fishing line and a needle for cross-linking of the finished beadwork (if necessary).
To weave a hare we will use the technique of three-dimensional beading. We met such a beading technique in our tutorials many times, so you can learn the basics of three-dimensional beading in this and this tutorials.
The main idea of three-dimensional beading is that each row in the beadwork consists of two tiers which are situated one above the other. So, at first we make the upper tier of the 1st row, then make the lower tier of the 1st row, after that make the the upper tier of the 2nd row, next make the lower tier of the 2nd row and so on.
Now the upper tiers of beads will form the upper side of the hare’s head and then its back, and the lower tiers of beads will form the lower side of the hare’s head and then its tummy.
Let’s start weaving. Take a wire 80 cm long (or a little longer) and string on it 1 pink bead for the upper tier of the 1st row and then 2 white beads for the lower tier of the 1st row. Place the set of beads on the middle of the wire.

Take the end of the wire that comes out from the pink bead and cross it through both white beads.

Tighten the ends of the wire trying to keep the beads on the middle of the wire. We’ve got two tiers of the 1st row. The upper tier consists of one pink bead and the lower tier consists of two white beads.

2nd row:
For the upper tier string 5 white beads on any end of the wire

and cross the other end of the wire through all these beads.

Tighten the wire and bend it placing the beads above the white beads in the lower tier of the 1st row.

Side view at this stage:

Next, make the lower tier of the 2nd row. String 3 white beads on any end of the wire

and cross the other end of the wire through all these beads.

Tighten the wire and bend it placing the beads below the upper tier of the current row.

Side view at this stage:

All the other rows make in the same way.
3rd row:
For the upper tier string the beads in the following sequence: 2 white, 1 black, 3 white, 1 black, 2 white.

The lower tier: 4 white beads.

For further weaving use white beads only.
4th row:
The upper tier: 10 white beads.
The lower tier: 3 white beads.

5th row:
The upper tier: string 9 beads on any end of the wire, cross the other end of the wire through them and then slightly pull the ends of the wire but do not tighten them at the moment.

Take two additional pieces of wire 20 cm long each and pass them through the 3rd and 4th beads from the each side of the current tier. First, pass one additional piece of wire through the 3rd and 4th beads from one side of the tier

and then pass another additional piece of wire through the 3rd and 4th beads from the other side of the tier.

Tighten the basic wire and continue weaving on it. We will use the additional wires later, for weaving the ears of the hare.

Next, make the lower tier of the 5th row, consisting of 2 beads.

Side view at this stage:

6th row:
The upper tier: 6 beads.
The lower tier: 6 beads.

7th row:
The upper tier: 5 beads.
The lower tier: 8 beads.

8th row:
The upper tier: 5 beads.

For the lower tier string 10 beads on any end of the wire, cross the other end of the wire through them and then slightly pull the ends of the wire but do not tighten them at the moment. Take two additional pieces of wire 20 cm long each and pass them through the 3rd and 4th beads from the each side of the current tier.

Tighten the basic wire and continue weaving on it. We will use the additional wires later, for weaving the forepaws of the hare.

9th row:
The upper tier: 6 beads.
The lower tier: 12 beads.

10th row:
The upper tier: 6 beads.
The lower tier: 12 beads.

11th row:
The upper tier: 5 beads.

The lower tier: 11 beads. When making this tier, pass two final additional pieces of wire 20 cm long each through the 3rd and 4th beads from the each side of the tier.

Tighten the basic wire and continue weaving on it. We will use the additional wires later, for weaving the hind paws of the hare.

12th row:
The upper tier: 3 beads.
The lower tier: 8 beads.

13th row:
The upper tier: 2 beads.
The lower tier: 4 beads.

The 14th row: only the upper tier - 2 beads.

Complete weaving the body and make the tail. It consists of only 1 bead.

Secure the basic wire. Pass any end of the wire through the previous row of beads,

then twist together both ends of the wire and trim them.

Bend the tip of the wire and hide it between the rows of beads.
Side view at this stage:

Now straighten all the additional wires and pull them so that they are of the equal length at both sides.
Then make the ears using the additional wires in the upper tier of the 5th row.
Both ears are identical, weave them in flat parallel weaving using the following pattern:
1st row: 3 beads.
2nd row: 4 beads.
3rd row: 3 beads.
4th row: 2 beads.

Secure the wire. Pass any end of the wire through the previous row of beads,

then twist together both ends of the wire and trim them.

Bend the tip of the wire and hide it between the rows of beads.
In the same way make the other ear.

Next, make paws. For the forepaws use the additional wires in the 8th row. For the hind paws use the additional wires in the 11th row. Weave all the paws in flat parallel weaving.
Make each forepaw using the following pattern:
1st row: 2 beads;
2nd row: 2 beads;
3rd row: 1 bead.

For the each hind paw use the following pattern:
1st row: 2 beads;
2nd row: 2 beads;
3rd row: 2 beads.

Weaving of the hare is finished. If there are big gaps between the rows of beads, you may need to sew the figure with a thin fishing line. To do so, use the technique of cross-linking which is described in detail here or here. You should sew only the body and the head of the hare. It is not necessary to sew the ears and paws.

The beaded hare is finished!

P.S. If you like this tutorial, share it with your friends on social networks using the buttons below the post.
Don't want to miss new tutorials? Subscribe for email notifications of site updates or follow us on Twitter!
No comments:
Post a Comment