
We continue a series of keychains with zodiac signs. Today is the turn of Lion (or Leo as a zodiac sign). For beading we will use the technique of brick stitch, but in a more complicated version than before: our Lion will be a separate figure, with no background.
We will need:
- size 8 seed beads of six colors; I used seed beads of yellow, orange, grey, pink-grey, red and blue colors,
- nylon line 0.25 mm in diameter and two beading needles (as usual, for basic weaving we will need only one needle, and if you can weave the first row without the second needle, you can do without it at all).
I remind you that the basics of brick stitch beadweaving technique you can learn from this tutorial.
To make a figured product in brick stitch we should learn some additional methods of this beading technique that allow us to add beads at the edges of rows.
So today’s tutorial is quite large but you will learn almost all the basics of brick stitch that can be used for weaving flat figured products out of seed beads.
As usual, the whole product requires a long nylon line, so I recommend you to take a line of a convenient length and as soon as it becomes too short you should fasten it, take the new line, weave it into the product and continue weaving using this new segment of line. For the first segment I recommend to take a line of about 2 meters in length and for all the other segments I recommend to take a line of about 1 meter.
For the 1st row choose a row with the largest quantity of beads. It is the lower row of the Lion’s body.

For this row weave a single chain consisting of 18 yellow seed beads. To make such a chain use the technique of parallel weaving (make 18 rows of 1 seed bead in the each row). Start weaving on the middle of the nylon line.

Next, we will weave the upper part of the Lion. For weaving use either end of the line. The other end of the line we will use later, for weaving the Lion’s paws.
The 2nd row fully consists of yellow beads. At the beginning of the row string onto the nylon line only one bead (in contrast to weaving a beaded fabric, where at the beginning of each row we usually string two beads at once).

Attach this bead to the product in a usual way: pass the needle under the upper segment of the nylon line that connects two extreme beads of the 1st row,

then pass the needle backwards through the just-added bead


and after that tighten the nylon line. As a result, the first bead of the 2nd row have lain between two extreme beads of the 1st row.

After that in this row add one by one 16 more yellow beads in an ordinary manner.

Start the 3rd row with one yellow bead,

and then in this row add one by one 11 yellow and 4 orange beads.

Start the 4th row with two orange beads stringing them together.


Then in this row add one by one 4 orange and 9 yellow beads. This row is a little shorter than the previous row.

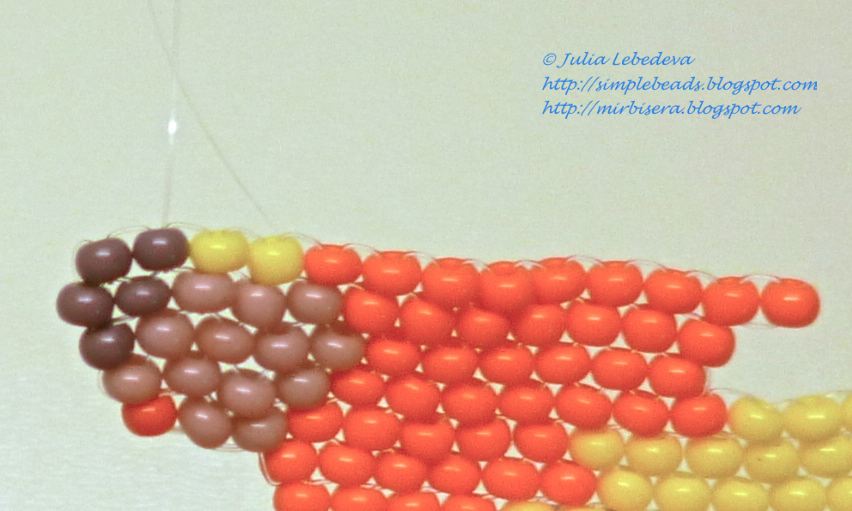
Start the 5th row with one yellow bead and then add one by one 8 more yellow and 5 orange beads.

After that in this row we should add 3 extra beads. The 1st additional bead is pink-grey. String it onto the nylon line,

pass the needle downwards through the extreme bead of the previous row,


and then pass the needle backwards through the just-added bead.

Tighten the nylon line. The last added bead extends slightly beyond the edge of the previous row and the nylon line comes out from above of this bead.

The 2nd additional bead in this row is pink-grey too. String it onto the nylon line,

pass the needle through the previous additionally added bead upwards from below,


and then pass the needle downwards through the just-added bead.

Tighten the nylon line. The last added bead is "hanging" in the air and the nylon line comes out from below of this bead.

The 3rd additional bead is red. Add it similarly, but change the direction of passing the line. So, string the bead onto the line,

pass the needle downwards through the previous additionally added bead,


and then again pass the needle through the just-added bead upwards from below.

Tighten the nylon line. The 3rd added bead is "hanging" in the air too and the nylon line comes out from above of this bead. The 5th row is finished.

Start the 6th row with two pink-grey beads stringing them together,

and then continue adding beads one by one in the following sequence: 2 more pink-grey, 7 orange and 6 yellow.

At the beginning of the 7th row string two beads at once: pink-grey and yellow.

Then add 2 more yellow beads one by one,

and then pass the needle through the beads of the penultimate row so that the nylon line came out from the nearest orange bead of the penultimate row upwards. So we left an empty space with a size of 3 beads.

Continue weaving the 7th row, adding beads one by one in the following sequence: 6 orange and 4 pink-grey.

At the end of the current row add an extra bead of a grey color. Make it in the same way as the 1st additional bead at the end of the 5th row was added: string the bead onto the nylon line,

pass the needle downwards through the extreme bead of the previous row,


and then pass the needle backwards through the just-added bead.


Start the 8th row with two grey beads stringing them together, and then add one by one 3 pink-grey and 6 orange beads.

After that at the end of this row add an extra bead of an orange color. Make it in the same way as an additional bead was added at the end of the previous row.

At the beginning of the 9th row string two orange beads at once.

After that in front of these beads we should attach one more orange bead. To do so pass the needle downwards through the 1st bead of the current row,


then string an orange bead onto the line,

again pass the needle downwards through the 1st (already the 2nd) bead of the current row,


and after that pass the needle upwards from below through the nearby (already the 3rd) bead in the row.

Tighten the nylon line. The just-added bead has became the 1st bead in the row.

Continue weaving the row in a usual way. Add beads one by one in the following sequence: 6 orange, 2 yellow and 2 grey.

To start the 10th row we should step back for one bead from the edge of the just-completed row. To do so first pass the needle downwards through the 1st bead of the penultimate (8th) row,

then pass it upwards from below through the 2nd bead of the 8th row and through the penultimate bead of the last (9th) row.

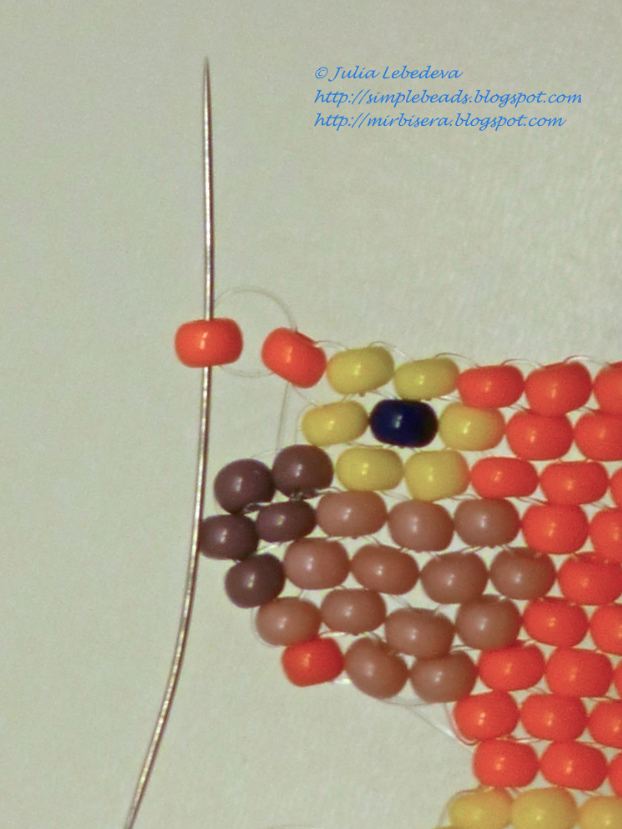
Start the 10th row with one yellow bead, and then add beads one by one in the following sequence: 1 blue, 1 yellow and 8 orange.

Start the 11th row with one orange bead, and then add one by one 7 more orange and 2 yellow beads.

After that in the current row we should add 2 extra orange beads. As the number of additional beads is even, we should use a little different method than we used earlier for adding an odd number of beads at the end of the 5th row. Add the 1st additional bead: string it onto the nylon line, pass the needle downwards through the first bead of the previous row

then pass the needle upwards from below through the next (blue) bead of the same row and then through the last yellow bead of the current (11th) row.


After that pass the needle downwards through the just-added bead

and tighten the nylon line. As a result, the nylon line comes out from below of the just-added bead.

The 2nd additional bead in the current row is orange too. String it onto the nylon line,

pass the needle downwards through the 1st additional bead,

and then pass it through the 2nd additional bead upwards from below.
Tighten the nylon line. Now the nylon line comes out from above of the 2nd additional bead. The 11th row is finished.

All the other rows in this part of the Lion are to be made out of orange beads only.
Start the 12th row with two beads stringing them together.

Next, in front of these beads we should attach two extra beads. Make it in the same way as we attached an additional bead at the beginning of the 9th row. First, pass the needle downwards through the 1st bead of the current row,

then string a bead onto the line,

again pass the needle downwards through the 1st (already the 2nd) bead of the current row,

and then pass it upwards from below through the just-added bead.


Add the 2nd additional bead in the similar manner: string it onto the line

and pass the needle upwards from below through the previously added bead.

Tighten the nylon line. With two additional beads there are four beads in the 12th row at the moment and the nylon line comes out from above of the 2nd bead in the row.

To continue weaving lead the line through the beads so that it came out from the currently last bead in the row (if we count from the beginning of the row).


After that continue weaving the row in a usual way and add 10 more beads one by one.

At the end of the row add 2 extra beads one by one. Make it in the same way as we attached additional beads at the end of the previous (11th) row.

At the beginning of the next three rows string only one bead.
The 13th row consists of 15 beads.
The 14th row consists of 14 beads.
The 15th row consists of 13 beads.

Start the 16th row with two beads stringing them together, and then add one by one 11 more beads.
In the same way start making the 17th row: at first string two beads together and then add one by one 11 more beads.

At the end of the current row we should add an extra bead and then lead the line out from the penultimate bead of the current row (so that we could start the next row with an indent of one bead from the edge of the just-completed row). That is why we should use a little different method than we used earlier for adding a bead at the end of the 7th row. Now string a bead onto the line,

pass the needle downwards through the extreme bead of the previous (16th) row,

then pass the needle upwards from below through the 2nd bead of the 16th row and then through the penultimate bead of the current (17th) row.


In the 18th row string 12 beads one by one.

At the end of this row we should add an extra bead and then lead the line out from the 3rd bead from the end of the row (in order we could start the next row with an indent of two beads from the edge of the last row). So, string a bead onto the line,

pass the needle downwards through the extreme bead of the previous (17th) row,

then pass the needle upwards from below through the 2nd bead of the 17th row and then through the 3rd bead from the edge of the current (18th) row.


The 19th row consists of 9 beads, all of them string one by one.

In the 20th row string 8 beads one by one.

At the end of this row we should add an extra bead and then lead the line out from the 4th bead from the end of the row (so that we could start the next row with an indent of three beads from the edge of the last row). Use again the method similar to that we used for adding beads at the end of the 17th and 18th rows. String a bead onto the line,

pass the needle downwards through the extreme bead of the previous (19th) row and through the 4th bead of the 18th row,

then upwards from below through the 5th bead of the 18th row, through the 3rd bead of the 19th row and then through the 4th bead from the edge of the current (20th) row.


In the 21st row string 5 beads one by one.

At the end of this row we should add an extra bead and then lead the line out from the 2nd bead from the beginning of the current row. To do so string a bead onto the line,

pass the needle downwards through the extreme bead of the previous (20th) row,

and after that pass it in a zigzag manner through the beads so that it came out from the 2nd bead from the beginning (i.e. the opposite side) of the 21st row.

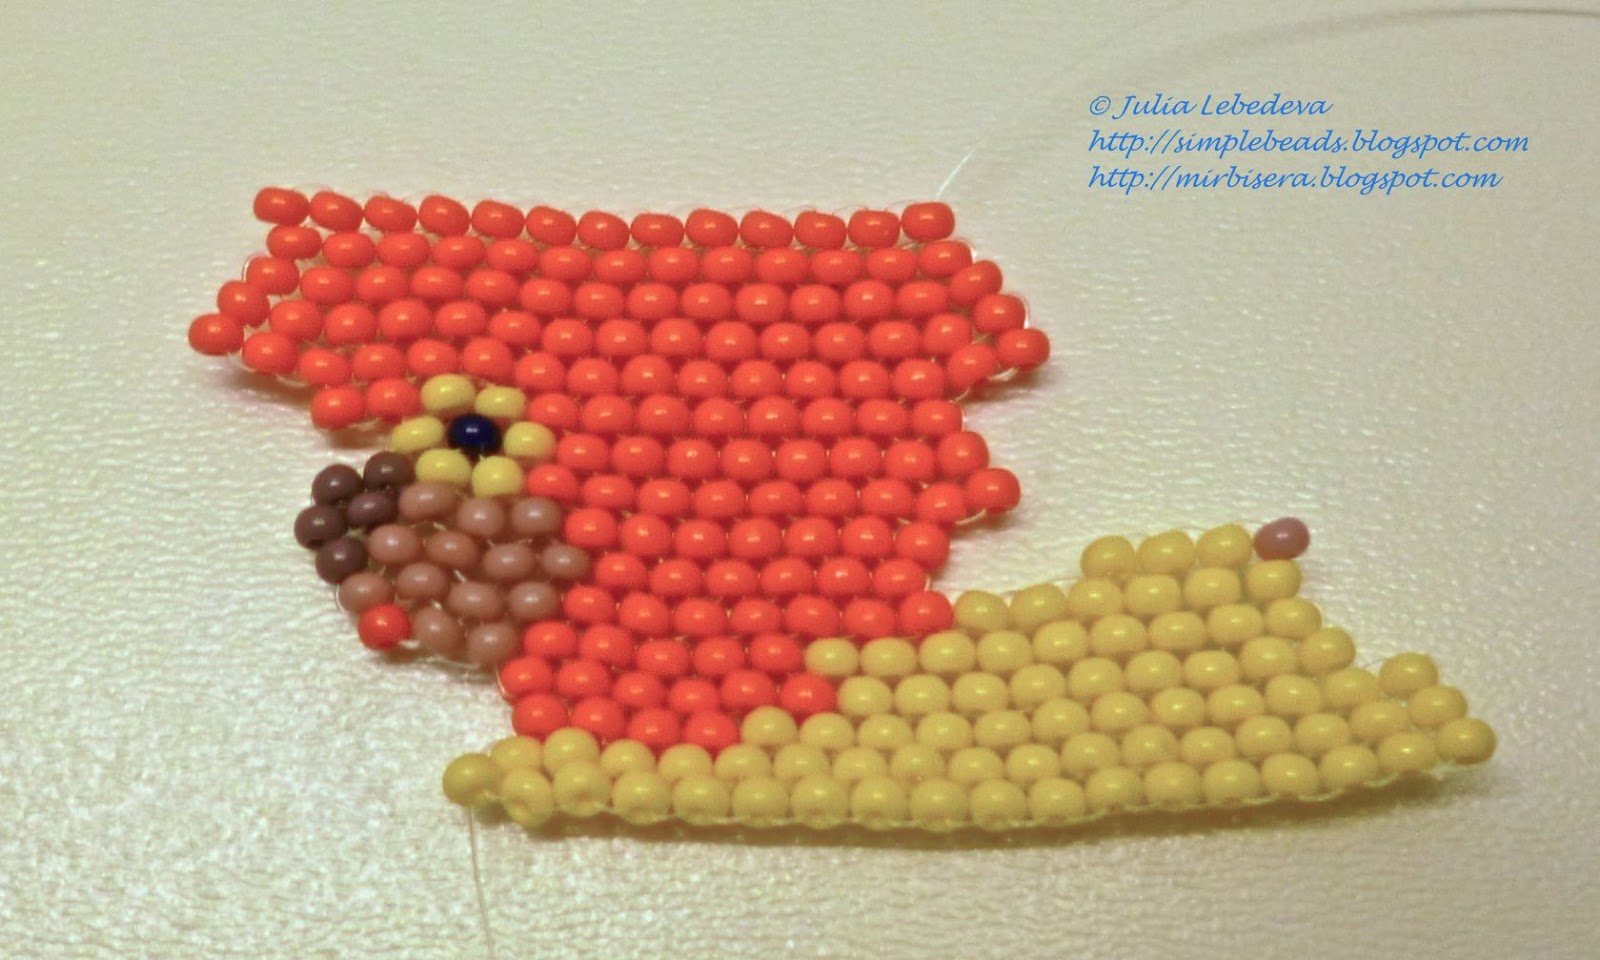
The 22nd row is the last row in this part of the figure. This row consist of only one bead.

If you are going to use the Lion as a keychain, you may leave the remaining end of the nylon line for a while and use it later for attaching a keyring to the finished figure. But if you don’t need this nylon line any more, fasten it by passing it in a zigzag manner through several beads in the middle part of the figure and then cut it off.

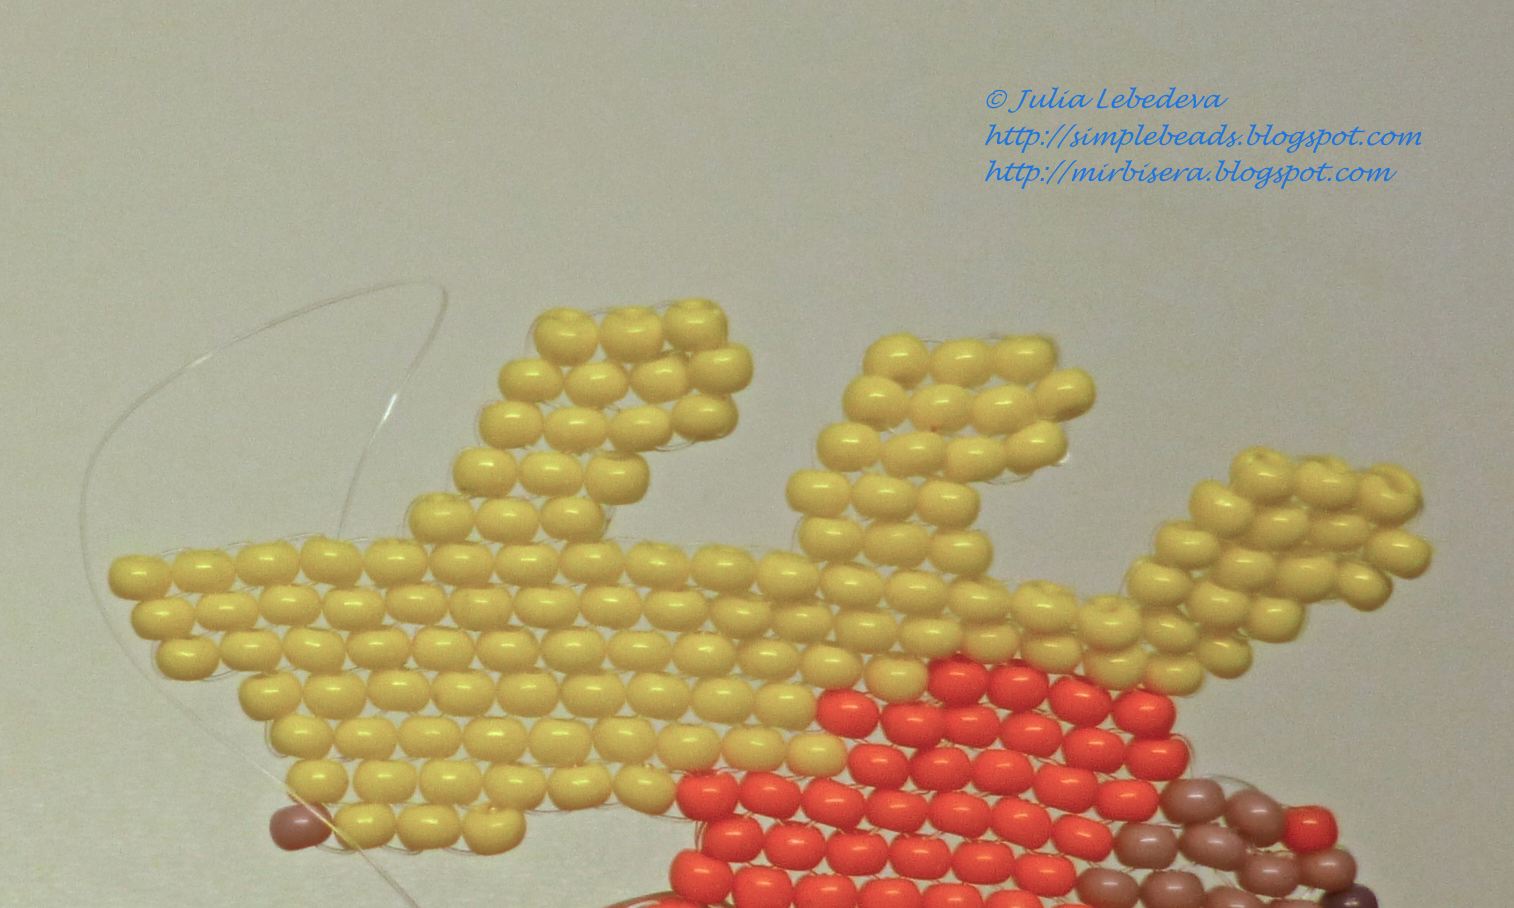
Now go back to the first row of weaving, take the other end of the initial line and start weaving the Lion’s paws. For all the paws use only yellow beads. The each paw is woven separately.
For our convenience I turned the Lion upside down in order the rows in paws to be counted in the same direction as the rows in the Lion’s body (upwards from below). Also, I will keep score of the rows in the each paw again, beginning with the first row.
To weave the 1st paw use the following pattern:
1st row: start with 2 beads together, and then add 1 bead in a usual way.

2nd row: start with 2 beads stringing them one by one,

and then at the end of the row add one by one 2 extra beads using the same method as we used at the end of the 11th row of the Lion’s body.

3rd row: start with 2 beads stringing them together, then in a usual way add one by one 2 more beads.

4th row: 3 beads added one by one in a usual way.

Weaving of the 1st paw is finished. In order to start the 2nd paw lead the line through the beads so that it came out from the 5th bead of the 1st row of the Lion’s body (if we count from the head).

To weave the 2nd paw use the following pattern:
1st row: 3 beads added one by one in a usual way.

2nd row: start with 2 beads together, then add 1 bead in a usual way.

3rd row: start with 2 beads stringing them together,

then in front of them add an extra bead using the same method as we used at the beginning of the 9th row of the Lion’s body.

Finish this row by adding 1 bead in a usual way.

4th row: start with 3 beads stringing them one by one,

then at the end of the row add one extra bead using the same method as we used at the end of the 7th row of the Lion’s body.

5th row: 3 beads added one by one in a usual way.

Weaving of the 2nd paw is finished. In order to start the 3rd paw lead the line through the beads so that it came out from the 11th bead of the 1st row of the Lion’s body (if we count from the head).

To weave the 3rd paw use the following pattern:
1st row: 3 beads added one by one in a usual way.

2nd row: start with 2 beads stringing them one by one,

and then at the end of the row add one extra bead using the same method as we used at the end of the 7th row of the Lion’s body.

3rd row: start with 2 beads stringing them together,

then in front of them add an extra bead using the same method as we used at the beginning of the 9th row of the Lion’s body.

Finish this row by adding 1 bead in a usual way.

4th row: start with 3 beads adding them one by one in a usual way,

and then at the end of the row add one extra bead using the same method as we used at the end of the 7th row of the Lion’s body.

5th row: 3 beads added one by one in a usual way.

Weaving of the 3rd paw is finished. In order to start the 4th paw lead the line through the beads so that it came out from the 15th bead of the 1st row of the Lion’s body (if we count from the head).
To weave the 4th paw use the following pattern:
1st row: 3 beads added one by one in a usual way.

2nd row: start with 2 beads stringing them one by one,

and then at the end of the row add one by one 2 extra beads using the same method as we used at the end of the 11th row of Lion’s body.

3rd row: start with 2 beads stringing them together,

then add one by one 2 more beads in a usual way.

4th row: 3 beads added one by one in a usual way.

Weaving of the 4th paw is finished. Fix the line: pass it in a zigzag manner through several beads in the middle part of the figure and cut it off.

Now make the Lion’s tail. For the tip of the tail use the same beading technique of brick stitch.
Take an additional piece of nylon line of 60 cm in length and weave onto it a single chain consisting of 5 orange beads. Start weaving on the middle of the nylon line.

Then take either end of the line (if they are of different length, choose the shorter one) and weave onto it the 2nd row by adding one by one 4 orange beads.

Next, pass the line through the beads so that it came out from the penultimate bead of the current row,

and then make the 3rd row: one orange bead above the center of the last row.

After that fix (as usual, by passing in a zigzag manner through several beads) and cut off this end of the nylon line.

Then take the other end of the nylon line and symmetrically weave onto it the same two (the 2nd and the 3rd) rows of beads as we wove onto the first end of the line.

After that string onto the remaining end of the nylon line 9 pink-grey beads

and pass the needle through the pink-grey bead at the Lion’s back, so fastening the tail to the body.

Then fix the nylon line by passing it in a zigzag manner through several beads in the middle part of the figure and after that cut it off.
A beaded Lion is finished!

If you want to use this figure as a keychain, you should attach a ring for keys to it.

P.S. If you like this tutorial, share it with your friends on social networks using the buttons below the post.
Don't want to miss new tutorials? Subscribe for email notifications of site updates or follow us on Twitter!
I'm really confused about the start. You said to use the parallel weaving for the first step, but that doesn't look like the parallel weaving that I know of. It looks more like lader stitch but I have no idea how you got both threads coming out from the same side when you were finished. I'm just confused.
ReplyDeleteHi, The matter of translation is rather hard. You're right, the first row of the Lion is the ladder stitch of 18 rows with one bead in each row. But at the end of the chain the threads come out from different sides of the last bead, not from the same side. Here you can see it. Hope, my explanation will help you.
Delete